I recently changed my online name, and with that came a new website and blog design. Everything was going well, and the website looked good with the new dark theme. Except for one small design issue… The comments system I was using didn’t allow me to change the design. It tried to adjust it’s own colours to fit what I had, but some parts of it were still white, which didn’t really fit into the new design. But that wasn’t the big issue.
If you ever opened your browser’s DevTools while loading my blog, you probably saw something like this…
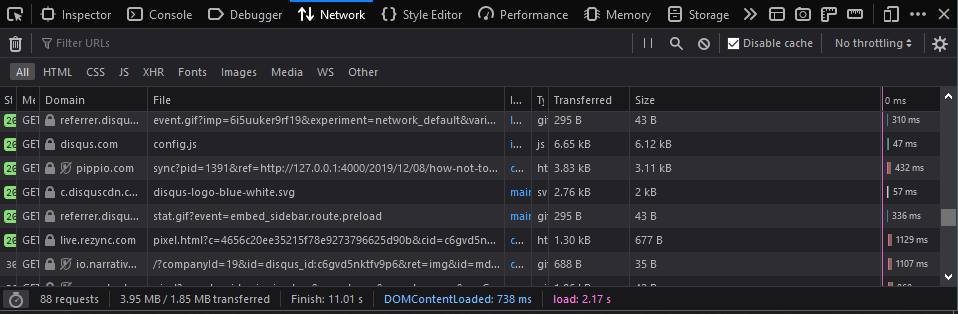
That’s a lot of requests and a lot of bandwidth usage for a script that should only be loading comments.
When I initially looked for a comments system to add to my blog, I chose Disqus for one reason… It’s everywhere. Most blogs I’ve read use it, and for the non-technical bloggers, it’s easy to just add a few lines of JavaScript and have a fully functional comments system.
If you didn’t know already, I live in South Africa and internet here is not cheap (it’s even more expensive for me as I don’t live close to the city). While I have uncapped internet at home, I know many people that don’t and I also often check my blog when I’m not at home on an even more expensive mobile data connection. I didn’t like that my blog was loading megabytes of files just to display comments and I know some of my more privacy-conscious followers wouldn’t like what data is sent back to and processed by Disqus (they’re owned by a marketing company, which explains a lot).
I needed to find a way to make my website as small and fast as possible, and reduce privacy issues (and before you start commenting about how I’m using Google Analytics, I do have plans to change to a self-hosted analytics solution but can’t afford another server now). I tried many services, and while they sent less requests, they still loaded megabytes of files.
After not being happy with the Disqus alternatives that I found, I decided to make my own. It would give me more control over how the data is stored, how the comments are displayed, and how fast my blog loads (I am still in the process of improving the site load time). I would be solving all the issues I had with Disqus.
And here are the results from DevTools…
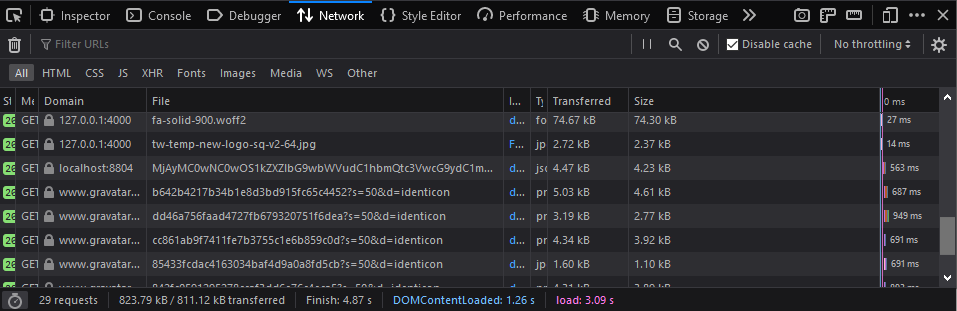
Much better. Both of the above screenshots were from a version of my blog running on my computer, and a VPN was used in the second one to allow me access to the development database (I needed a static IP address to whitelist on the database server, so used my VPN).
It costs me almost nothing to run the comments system, as I’m using the free tier of MongoDB Atlas, and the API is hosted on a €2.49/month VPS in Europe which already runs other APIs. If you want to use this comments system yourself, but don’t have any servers, use this link to get €20 credit at Hetzner.
So that explains why I created my own comments system. Here’s how:
Before I continue, there are some things which you should keep in mind:
- This code was written over a few days, some of which I was watching a friend stream on Twitch, so my full attention wasn’t on the code. The code isn’t that good, but it works. Feel free to suggest ways to improve this in the comments or by sending me an email.
- The code used in this post is insecure. Security isn’t the focus of this post, and I wouldn’t be able to write about all of the security vulnerabilities to keep in mind (and how to mitigate them) here without making this post too long (and even then, I’d probably miss something). It is your responsibility to add the necessary security features. The code published on GitHub is as secure as I could make it, although there may be some issues that I overlooked. If you find any of these issues, please report it to me.
- To keep this post as short possible while still including as much information as I can, certain parts of the code have been left out (mostly dependencies, form validation, and the more advanced features such as moderation). Let’s start with the API first.
A comments system wouldn’t be a comments system without a way to post comments. So, here’s the code for that.
    app.post('/comment', function (req, res) {
    	const collection = client.db(dbName).collection("comments");
    	var document = {
    		post: req.body.post,
    		id: uuid.v4(),
    		name: req.body.name,
    		email_hash: md5(req.body.email),
    		comment: req.body.comment,
    		time: moment().utc().format('D MMMM YYYY h:mm A Z'),
    		spam: false
    	};
    	collection.insertOne(document).then(function() {
    		res.json({success: true, message: 'Comment submitted'});
    	}).catch(function(e) {
    		console.log('Error:');
    		console.log(e);
    		res.json({success: false, message: 'Error while inserting data'});
    	});
    });
Pretty simple code. All it does is take what is sent in the form, add some more details (the user’s hashed email address for showing Gravatar pictures, the time, and an ID), and add it to the database. This can easily be changed to include other data, such as the user’s IP address (useful for some features of spam filters) but I don’t want to store data like that in my database. Next up is the code for replies. I wanted people to be able to leave replies to comments, there’s really no point in allowing people to leave comments but not reply to others.
    app.post('/reply', function (req, res) {
    	const collection = client.db(dbName).collection("replies");

    	var document = {
    		post: req.body.inReplyPost,
    		id: uuid.v4(),
    		name: req.body['tw-rf-name'],
    		in_reply_to: req.body.inReplyTo,
    		in_reply_root_comment: req.body.inReplyRootComment,
    		email_hash: md5(req.body['tw-rf-email']),
    		comment: req.body['tw-rf-comment'],
    		time: moment().utc().format('D MMMM YYYY h:mm A Z'),
    		spam: false
    	};

    	collection.insertOne(document).then(function() {
    		res.json({success: true, message: 'Comment submitted'});
    	}).catch(function(e) {
    		console.log('Error:');
    		console.log(e);
    		res.json({success: false, message: 'Error while inserting data'});
    	});
    });
It is mostly the same as the code for posting comments, with two additions. inReplyTo is the comment (or reply) that the user replied to. inReplyRootComment is used for pagination, but I’ll come back to that later.
And now for a way to retrieve the comments and replies from the database.
    app.get('/comments/:post', function(req, res) {
    	var pageNum = parseInt(req.query.page);
    	if (!req.query.page) pageNum = 1;
    	var skip = config.pagination.perPage * (pageNum - 1);

    	var post = base64.decode(decodeURIComponent(req.params.post));

    	const collection = client.db(dbName).collection("comments");

    	var commentFacetData;
    	if (config.pagination.enabled) {
    		commentFacetData = [ { $skip: skip }, { $limit: config.pagination.perPage } ];
    	} else {
    		commentFacetData = [ { $skip: 0 } ];
    	}
    	collection.aggregate([{ $match: {
    		spam: false,
    		post: post
    	  }
    	}, { $sort: { time: -1  } }, { $facet : {
    			metadata: [ { $count: "total" }, { $addFields: {
    				pages: { $ceil: {$divide: [ "$total", config.pagination.perPage ] } },
    				page: pageNum
    			} } ],
    			comments: commentFacetData
    		}
    	}
    	]).toArray(function(err, data) {
    		if (err) {
    			res.json({success: false, message: 'Error while fetching data'});
    			return console.log(err);
    		}

    		const collection2 = client.db(dbName).collection("replies");

    		var commentsIDArr = [];

    		function getCommentReplies() {
    			if (commentsIDArr.length === 0) {
    				return res.json({success: true, metadata: data[0].metadata[0], data: {comments:data[0].comments,replies:[]}});
    			}

    			collection2.find({ spam: false, post: post, in_reply_root_comment: { $in: commentsIDArr }}).toArray(function(err, data2) {
    				if (err) {
    					res.json({success: false, message: 'Error while fetching data'});
    					return console.log(err);
    				}

    				res.json({success: true, metadata: data[0].metadata[0], data: {comments: data[0].comments, replies: data2}})

    			});
    		}

    		if (data[0].comments.length === 0) {
    			return res.json({success: true, metadata: data[0].metadata[0], data: {comments: [], replies: []}});
    		}

    		for (var i = 0; i < data[0].comments.length; i++) {
    			commentsIDArr.push(data[0].comments[i].id);
    			if (i === (data[0].comments.length -1)) {
    				getCommentReplies();
    			}
    		}
    	});

    });
What this does, is get all the comments from the database, then loop through these to get the in_reply_root_comment. Then, only the replies that match one of these are retrieved from the database and added to the response.
For the other programmers reading this and wondering why I’m using the commentFacetData variable, I know there’s a better way to do this. But I couldn’t figure out how to do limits (like with the above commentFacetData) with collection.find(). If you know a better way to do this, please send me a message.
And lastly, if you want to add the number of comments that a post has on your blog’s homepage, this is the code for you.
    app.get('/count', function(req,res) {
    	var commentArr = [];

    	const collection = client.db(dbName).collection("comments");

    	collection.aggregate(
    		{ $match : { spam: false } },
    		{ $group: { "_id": "$post", "count": { $sum: 1 } } },
    		{ $project: { "post": "$_id", "count": 1 } }
    	).toArray(function(err, data) {
    		if (err) {
    			res.json({success: false, message: 'Error while fetching data'});
    			return console.log(err);
    		}
    		commentArr = data;

    		const collection2 = client.db(dbName).collection("replies");

    		collection2.aggregate(
    			{ $match : { spam: false } },
    			{ $group: { "_id": "$post", "count": { $sum: 1 } } },
    			{ $project: { "post": "$_id", "count": 1 } }
    		).toArray(function(err2, data2) {
    			if (err2) {
    				res.json({success: false, message: 'Error while fetching data'});
    				return console.log(err2);
    			}

    			if (data.length === 0 && data2.length === 0) {
    				return res.json({success: true, data: []});
    			}
    			for (var j = 0; j < data.length; j++) {
    				for (var i = 0; i < data2.length; i++) {
    					if (data[j]._id === data2[i]._id) {
    						commentArr[j].count += data2[i].count;
    					}
    					if ((j === commentArr.length - 1) && (i === data2.length - 1)) {
    						res.json({success: true, data: commentArr});
    					}
    				}
    			}
    		});
    	});
    });
Again, there’s probably a better way to do this and I’m sure someone will send me a message with improved code.
Now for the code that shows the comments on the blog.
You may need to change the code to make it work on your blog.
Let’s do the smallest bit of code first, this is for showing the number of comments each post has on the home page.
    var commentsAPI = 'API_URL_HERE';
    var xhr = new XMLHttpRequest();
    xhr.open('GET', commentsAPI+'/count');
    xhr.onload = function() {
    	var count = JSON.parse(this.responseText);
    	if (count.success) {
    		for (var i = 0; i < count.data.length; i++) {
    			var postURL = count.data[i]._id.split('-').slice(0,3).join('/') + '/' + count.data[i]._id.split('-').slice(3).join('-');
    			$('.post-link[href="/'+postURL+'"]').parent().parent().find('.post-meta').find('a').text($('.post-link[href="/'+postURL+'"]').parent().parent().find('.post-meta').find('a').text()+ ' ('+count.data[i].count+')');
    		}
    	}
    }
    xhr.send();
Next up, some HTML elements where everything will be added to:
    <div id="tw-comments"></div>
    <span class="spinner-border text-success" role="status" id="comments-spinner" style="display:none;"></span>
    <button style="display:none;" class="btn btn-primary" id="load-more-btn">Load More</button>
I used Bootstrap when designing, so if you aren’t using Bootstrap, you will need to add the spinner and CSS in manually.
And now to add the comments and replies to the page.
    var commentsAPI = 'API_URL_HERE';
    var commentsArray = [];
    function loadComments(page) {
    	if (!page) page = 1;

    	var xhr = new XMLHttpRequest();
    	xhr.open('GET', commentsAPI+'/comments/'+encodeURIComponent(btoa(location.pathname.slice(1).replace(/\//g, '-').replace('.html', '')))+`?page=${page}`);
    	xhr.onload = function() {
    		$('#comments-spinner').hide();
    		var data = JSON.parse(this.responseText);
    		if (data.success === false) {
    			return document.getElementById('tw-comments').innerText = 'Failed to load comments';
    		}

    		var metadata = data.metadata;
    		var twcomments = data.data.comments;
    		var replies = data.data.replies;

    		function Comment(props) {
    			return html`
    				<div data-comment-id="${props.id}" class="${props.type}">
    					<table>
    						<tr>
    							<td>
    								<img data-email-hash="${props.email_hash}" src="https://www.gravatar.com/avatar/${props.email_hash}?s=50&d=identicon" class="${props.type}-image" />
    							</td>
    							<td>
    								<div class="${props.type}-name">${props.name}</div>
    								<div class="${props.type}-time">${props.time}
    									<span class="comment-reply">
    										<a href="#" class="comment-reply-btn" data-tw-crb-id="${props.id}" data-tw-crb-type="${props.type}">Reply</a>
    									</span>
    								</div>
    								<div class="${props.type}-text">${props.comment}</div>
    							</td>
    						</tr>
    					</table>
    					${repliesP(props.id)}
    				</div>
    			`;
    		}

    		function repliesP(id) {

    			function getRepliesP(id) {
    				var r = [];
    				for (var i = 0; i < replies.length; i++) {
    					if(replies[i].in_reply_to === id)  {
    						r.push(replies[i]);
    					}
    				}
    				return r;
    			}

    			var repliesArr = [];

    			function addRepliesP(id) {
    				var rp = getRepliesP(id);
    				//console.log(rp);

    				for (var i = 0; i < rp.length; i++) {
    					repliesArr.push(html`<${Comment} id=${rp[i].id} email_hash=${rp[i].email_hash} name=${rp[i].name} time=${rp[i].time} comment=${rp[i].comment} type="reply" />`);
    					if (i === rp.length - 1) {
    						return repliesArr;
    					}
    				}
    			}
    			return addRepliesP(id);
    		}

    		const html = htm.bind(preact.h);

    		for (var i = 0; i < twcomments.length; i++) {
    			commentsArray.push(html`<${Comment} id=${twcomments[i].id} email_hash=${twcomments[i].email_hash} name=${twcomments[i].name} time=${twcomments[i].time} comment=${twcomments[i].comment} type="comment" />`);
    		}
    		preact.render(commentsArray, $('#tw-comments')[0]);

	  	if (data.success && data.metadata && data.metadata.page < data.metadata.pages) {
	  	    $('#load-more-btn').show();
	  	}
    }
    xhr.send();

    var commentsPage = 1;
    $('#load-more-btn').on('click', function() {
    	$('#load-more-btn').hide();
    	$('#comments-spinner').show();
    	loadComments(commentsPage+1);
    	commentsPage++;
    });
This will send a request to the API to retrieve the comments for this post, and then add those to the page. I initially did this with a mess of document.createElement() and elem.appendChild(), but rewrote it using Preact, a lightweight React alternative. This reduced the amount of code needed while making it really easy to see how the code would be added to the page. As a in-browser replacement for JSX, I used HTM. If you’re looking for the changes to the code made during this rewrite, you can find them here.
At this point, you should now have a working comments system. But it doesn’t really look that good, so you’ll need to add some CSS to fix that.
    .comment {
        margin-bottom: 8px;
    }
    .reply {
        margin-left: 64px;
        margin-top: 8px;
    }
    .comment-name, .reply-name {
        font-size: xx-large;
    }
    .comment-reply {
    	margin-left: 4px;
    	border-left: 1px solid black;
    }
    .comment-reply-btn {
    	margin-left: 4px;
    }
    .comment-image, .reply-image {
    	margin-right: 8px;
    }
    .image-td {
    	vertical-align: top;
    }
You will need to add your own comment and reply forms to fit with the design of your blog. While you are free to use this code to make your own comments system, please add a link to this post (or just my website) if you do.
The version of this comments system used on my blog includes many more features:
- reCAPTCHA to stop bots
- Akismet for spam filtering
- SendGrid for notifying me of new comments
- Discord webhooks for notifying me of spam comments
- A moderation dashboard
- PushOver notifications
- Verification mark when I comment
This started as a way to move away from the bloated, data-collecting Disqus. But it soon turned into a learning experience. I had used MongoDB once before, and that was with code someone else wrote. It was the first time I had to write the code to store and retrieve data from MongoDB myself, and the same is true for Akismet and Preact. If it wasn’t for this project, I probably wouldn’t have used these until my job required them.
Comments
Leave a comment
Please note that some comments may require moderation, as determined by Akismet. Read their privacy policy to learn more about how they process your data.